
Have you ever done a drawing where you felt that you needed to fill in all the space with shading of some sort?
It might surprise you when I tell you that you don’t have to do that. In fact, it’s sometimes good if you don’t. Leaving white places can illustrate the spots that the light is hitting most, which in turn gives your drawing more shape.
I call this negative shading. Your piece of paper is all negative space. Leaving some of the ‘negative space’ with nothing in it and shading the rest helps the shading to look shadier! Think of it as white next to black vs. grey next to black. Black looks much darker next to white, even if the same shade of black is placed next to grey.
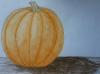
Have a look at this pumpkin I drew. (Really gets you into autumn mood, doesn’t it?) See how I left a little bit towards the top only very lightly colored? And that’s the most 3D part of the drawing. To leave those spots clear and decide where the shadow should be, you have to decide where to put the imaginary light source. I chose the top left area for the light source.
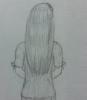
Here’s a girl I drew, focusing mostly on the hair. I wanted to give the hair a glossy effect, and to accomplish that I left a few areas blank. These lighter areas are darker than what is around them, giving the impression that they are bright spots on something dark, rather than simply undrawn space.
Have you ever taken a picture and seen that some of the spots were washed out because they were in such intense light? Look at something shiny, or almost anything near you. Which places are lightest? Probably the ones being hit most directly by the light. That’s the sort of thing you want to be aware of while drawing. Think about whatever you’re drawing and where the light source is, the shape of your object, and where it would be logical for the light to hit. Hold back from shading certain places. Experiment. Pencils have erasers because everyone messes up, so do not be afraid to erase or make mistakes.
Next time you sit down and pick up your pencil to draw, remember these steps for (not)shading:
1. Decide where the light source is.
2. Figure out how the light is landing on your object.
3. Leave the places in the most direct light either white or extremely lightly shaded.
Now go draw something! I’m sure Catsi and Elisabeth would LOVE it if you posted your work using this technique!

~Alexandra S. Grey (P. H. Alexandra)
http://cloudywithach...ouquetsofbooks/
We have a poetry, prose, and art contest with the theme "autumn" currently open. See details here.
Yes, we would be quite happy to see your work, using any technique, actually.
ReplyDeleteWhat she said! I always love seeing what you guys come up with. :)
DeleteCool! Thanks, Alexandra! It's nice to have some more drawing pointers. :)
ReplyDelete